FAQ

Frequently Asked Questions

What is OralScan?

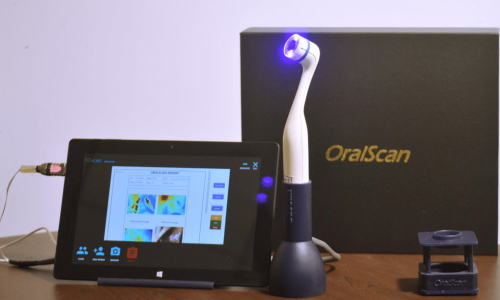
OralScan is a handheld imaging device that consists of multiple LEDs emitting violet, green, and red wavelengths to illuminate the oral cavity tissue and a monochrome camera for image capture. The device has the ability to screen and detect pre-cancers of the oral cavity and guide the clinician to the most malignant site for biopsy. The biopsy guidance feature of the device will improve the accuracy of disease diagnosis and patient care.

What happens to the patient during OralScan screening?

The patient would be asked to wash his/her mouth with water and/or chlorhexidine. After cleaning the mouth with a cotton swab to remove the presence of saliva, the site in the oral cavity will be screened for any abnormality using OralScan in video mode with violet light illumination. If any abnormal lesions are seen visually, or on the display screen in PC or monochrome modes, a detailed investigation is conducted following image capture and analysis using a cloud-based ML algorithm.

Why do I need to go for a screening using OralScan?

OralScan can screen and detect oral precancers and cancers. All persons above the age of 30 years who use tobacco products and/or alcohol are recommended to undergo regular screening for oral cancer. There are chances of non-healing traumatic ulcers getting converted to malignant tumors within a few months of their appearance.  If detected early the cost of treatment and chances of death will be very minimal.

Is OralScan screening painful?

No, this is a non-invasive device that will not touch any body parts and the intensity of LED light used is well within safe limits.

How does OralScan work?

Oralscan records the diffusely reflected light from the tissue which has signature information about oxygenated hemoglobin absorption changes in abnormal tissue. to increase the accuracy of the device it records the autofluorescence in blue light.

Are the OralScan lights harmful to the human body?

No, the device uses low-power LEDs in the visible range.

How much time will it take to complete a screen using OralScan?

The procedure will be completed in less than 5 minutes.

How often should I calibrate the device before screening?

The device should be calibrated each time the room light conditions change. It is suggested to calibrate the device every day before initiating the screening.

What if the device gets disconnected during screening?

If during screening the device gets disconnected, the probe should be removed from the port and then reconnected. On the software, a pop-up window will appear and the ‘retry’ option should be selected. 

What if three LEDs didn’t trigger during screening?

The images recorded should be discarded and scanning can be retaken.

Is it necessary to do the screening under dark room conditions?

The camera captures diffusely reflected (scattered) light and fluorescence light emanating from the inside of tissues that are of very low intensity.  Therefore under ambient room light conditions, it would be impossible to capture the low-intensity emission signals related to malignant transformations in tissue in the presence of the high-intensity background light.

I entered the patient details wrongly; how can I edit it?

On the patient profile window, there is an option to edit the patient details.

How do I upload histopathology results to the OralScan software?

Select the patient name from the Patient Directory, click on patient studies on the left side of the window—and select the site—on the bottom right side of the window click on the Histopathology button and select the file to be uploaded—click OK.

How do I share the OralScan screening data of a patient to the clinician for follow-up?

The report of screening of a particular patient can be downloaded as a PDF file and shared with the clinician.  To download the report: Select the patient from the Patient Directory, click on Patient Studies—and select the site—on the bottom left side of the window click on Download Report. The file gets downloaded to the Desktop.

How do I mark the ROI in an image?

The PC slider shall be adjusted slowly from the bottom to the top and shall be set to the point where the red color starts to appear. The region of interest (ROI) has to be marked very carefully with reference to the pseudo color (PC) fluorescence image (F405), the visual impression or photo taken on an intraoral camera or mobile phone, and the HbO2 map displayed on the screen in the PC. While marking the ROI, care should be taken to avoid the tooth or any reflecting objects (explorer mirror) or area with high brightness due to the presence of saliva

It is also necessary to mark in ROI  from apparently normal tissues belonging to the same anatomical site of the patient for control/referencing. Care should be taken to avoid margin areas of the lesion while taking control readings. It is advised to use a digital pen to mark the ROI.

After clicking calibrate the device, the software shows calibration is unsuccessful. What should I do?

You could reconnect the device and recalibrate it. If it fails again, reinstall the software. If the problem persists, contact customer care for support.

How do I enable grid lines in the software?

On the top bar of the site analysis screen, the user can activate the grid lines using the toggle switch and enter the required number of grid lines required.

While the device is already connected, the software is showing ‘connect the device and click on retry’.

This could be due to connectivity issues at the USB port. Try reconnecting the device to a Tablet or Laptop.

How do I upload the clinical photograph of a patient?

Select the patient from the Patient Directory, click on patient studies on the left side of the window—and select the site—on the bottom side of the window click on the Clinical  Photograph button—now select the image file to be uploaded—click OK.